 Home
Memoirs of a Gamer
Movies I watched
Guidebook
Links
Home
Memoirs of a Gamer
Movies I watched
Guidebook
Links
the Lobdegg's Comprehensive Guidebook to DOS Programming
Chapter 4 - Audio
Section 4: Ad Lib / OPL2 & OPL3
Introduction
The Ad Lib sound card and subsequent derivatives are quite the step up from a simple square wave generator like the PC Speaker, and even the Tandy 3 Voice sound chip. First released with the Yamaha YM3812 chip in 1987, referred to as OPL2, it set down a fairly complex and robust 9 channel FM synthesizer standard that would be followed for some time throughout the late 80s and the 90s. In 1992, Ad Lib would follow up it's success with the Yamaha YMF262, referred to as OPL3, which expanded the standard from 9 channels to 18, and expanded from 4 sine based waveforms to 8 sine and non-sine based waveforms. Don't worry if you don't know what any of that means in any real sense, because that's exactly what this section aims to make clear.
Note: Channels will be numbered 0-17 through out this section.
The Ad Lib sound card is programmed by sending data, 8 bits at a time, to registers stored inside the Yamaha chips by first writing the register's index to the Index port (0x388), then writing the desired value to the Data port (0x389). Status information can also be retrieved from the Yamaha chips by reading from the Index port (0x388), during which the port is usually referred to as the Status port. Unlike MIDI or Sound Blaster, the IO addresses are thankfully fixed for most normal Ad Lib compatible devices. There is an exception in the modern era to this in the form of the OPL2LPT and OPL3LPT devices by Serdashop, and this will be discussed more later in this section.
To write 0x20 to index 0x01:
| Assembly | Borland Turbo C++ | Open Watcom |
    mov al, 0x01
    mov dx, 0x388
    out dx, al
    mov al, 0x20
    mov dx, 0x389
out dx, al |
outport(0x388,0x01); outport(0x389,0x20); |
outp(0x388,0x01); outp(0x389,0x20); |
The original OPL2 specification used almost the entirety of the 8 bit index address space, so when OPL3 was laid out, the decision was made to duplicate the index address space and use 4 IO addresses instead of 2. This takes the shape of a second Index port (0x38A) and a second Data port (0x38B). Following the trend I've often seen, this section will refer to OPL3's index space as 0x100 to 0x1FF. So understand when this text says "Write 1, to register 0x105 to activate OPL3 functionality", what is meant is that index 5 is written to 0x38A followed by a 1 to 0x38B. Many of the OPL2 registers are reflected in the OPL3's secondary index address space. If this sounds a bit wonky, don't worry, it will become clear when we start going over writing to channel and operator registers.
To write 1 to index 0x105:
| Assembly | Borland Turbo C++ | Open Watcom |
    mov al, 0x05
    mov dx, 0x38A
    out dx, al
    mov al, 0x01
    mov dx, 0x38B
out dx, al |
outport(0x38A,0x05); outport(0x38B,0x01); |
outp(0x38A,0x05); outp(0x38B,0x01); |
This document will reference this opl_write() function in the given example code below.
| Assembly | Borland Turbo C++ | Open Watcom |
opl_write:
    push bp
    mov bp, sp
    push ax
    push dx
    mov ax, [bp+4]
    cmp ax, 0x100
    jge .opl3
    mov dx, 0x388
    out dx, al
    mov ax, [bp+6]
    mov dx, 0x389
    out dx, al
    jmp .done
.opl3:
    mov dx, 0x388
    out dx, al
    mov ax, [bp+6]
    mov dx, 0x389
    out dx, al
.done:
    pop dx
    pop ax
    mov sp, bp
    pop bp
ret |
void opl_write(short i, char v) {
  if (i < 0x100) {
    outport(0x388,i);
    outport(0x389,v);
  } else {
    outport(0x38A,i);
    outport(0x38B,v);
  }
} |
void opl_write(short i, char v) {
  if (i < 0x100) {
    outp(0x388,0x01);
    outp(0x389,0x20);
  } else {
    outp(0x38A,0x01);
    outp(0x38B,0x20);
  }
} |
Initialization
The official method is as follows:- Reset both timers by writing 0x60 to index 0x04
- Set IRQReset by writing 0x80 to 0x04
- Read the Status port and save the result
- Write 0xFF to Timer 1 at index 0x02
- Start Timer 1 by writing 0x21 to 0x04
- Delay for at least 80 microseconds
- Read the Status port and save the result
- Reset both timers by writing 0x60 to index 0x04
- Set IRQReset by writing 0x80 to 0x04
- Bitwise AND both saved results by 0xE0. The first should result in 0x00, and the second should result in 0xC0. If both are true, OPL2 detected!
Note: For steps 1 & 2 keep in mind that when IRQReset is set, all other bits are ignored!
| Assembly | Borland Turbo C++ | Open Watcom |
    xor ax, ax
    mov [opl2], al

    push 0x60
    push 0x04
    call opl_write
    add sp, 4

    push 0x80
    push 0x04
    call opl_write
    add sp, 4

    mov dx,0x388
    in al, dx
    and al, 0xE0
    mov [s1], al

    push 0xFF
    push 0x02
    call opl_write
    add sp, 4

    ;TODO add 80ms delay

    push 0x21
    push 0x04
    call opl_write
    add sp, 4

    mov dx,0x388
    in al, dx
    and al, 0xE0
    mov [s2], al

    push 0x60
    push 0x04
    call opl_write
    add sp, 4

    push 0x80
    push 0x04
    call opl_write
    add sp, 4

    cmp byte [s1], 0
    jne .done
    cmp byte [s2], 0xC0
    jne .done

    inc [opl2]
.done: |
char s1, s2; opl_write(0x04,0x60); opl_write(0x04,0x80); s1 = inport(0x388) & 0xE0; opl_write(0x02,0xFF); opl_write(0x04,0x21); delay(80); s2 = inport(0x388) & 0xE0; opl_write(0x04,0x60); opl_write(0x04,0x80); opl2 = s1==0 && s2==0xC0; |
char s1, s2; opl_write(0x04,0x60); opl_write(0x04,0x80); s1 = inp(0x388) & 0xE0; opl_write(0x02,0xFF); opl_write(0x04,0x21); delay(80); s2 = inp(0x388) & 0xE0; opl_write(0x04,0x60); opl_write(0x04,0x80); opl2 = s1==0 && s2==0xC0; |
To activate OPL3 features, once you've successfully detected OPL3, set the OPL3 flag to 1 in the index 0x105 register.
To write 1 to index 0x105:
| Assembly | Borland Turbo C++ | Open Watcom |
    xor ax, ax
    mov [opl3], al
    mov dx, 0x388
    in al, dx
    and al, 0x06
    jnz .postopl3

    push 0x01
    push 0x105
    call opl_write
    add sp, 4

    inc [opl3]
.postopl3: |
opl3 = 0;
if ((inport(0x388) & 0x06)==0) {
  opl_write(0x105,0x01);
  opl3 = 1;
} |
opl3 = 0;
if ((inp(0x388) & 0x06)==0) {
  opl_write(0x105,0x01);
  opl3 = 1;
} |
Making Noise
Creating sound in OPL2 mode is quite easy. All you need to do is:- set the Attack / Decay register for a channel's operators
- set the channel's F-Number first via the channel's associated #A0 register.
- set the upper 2 bits of the F-Number, the octave, and set the Note On flag (= 1).
To turn on channel 3 with an F:
| Assembly | Borland Turbo C++ | Open Watcom |
    ;set op1 to 75
    ;that's Attack of 7 and a Decay of 5
    push 0x75
    push 0x68
    call opl_write
    add sp, 4

    ;same again with op2
    push 0x75
    push 0x6B
    call opl_write
    add sp, 4

    ;set the lower 8 bits of the F-Number.
    ;F-Number for an F in octave 4 is 0x1CA
    push 0xCA
    push 0xA3
    call opl_write
    add sp, 4

    ;Set the top 2 bits of the F-Number,
    ;the octave to 4,
    ;and turn the note on by oring 0x20!
    push (0x20|(4<<2)|0x01)
    push 0xB3
    call opl_write
    add sp, 4
|
\\set op1 to 75 \\that's Attack of 7 and a Decay of 5 opl_write(0x68,0x75); \\same again with op2 opl_write(0x6B,0x75); \\set the lower 8 bits of the F-Number. \\F-Number for an F in octave 4 is 0x1CA opl_write(0xA3,0xCA); \\Set the top 2 bits of the F-Number, \\the octave to 4, \\and turn the note on by oring 0x20! opl_write(0xB3,0x20|(4<<2)|0x01); | |
To turn off channel 3:
| Assembly | Borland Turbo C++ | Open Watcom |
;Although we're telling the note to
    ;turn off we still want the octave
    ;and F-Number to remain intact!
    ;Failing to do so will create weird
    ;Sound effects.
    push ((4<<2)|0x01)
    push 0xB3
    call opl_write
    add sp, 4
|
\\Although we're telling the note to \\turn off we still want the octave \\and F-Number to remain intact! \\Failing to do so will create weird \\Sound effects. opl_write(0xB3,(4<<2)|0x01); |
|
The left or right (or both) flags of the channel's associated #C0-#C8 indexed register.
Set Channel 3 from before to play out the left speaker only:
| Assembly | Borland Turbo C++ | Open Watcom |
    ;The Left playback bit is bit 4
    ;which makes 0x10 in hex.
    push 0x10
    push 0xC3
    call opl_write
    add sp, 4

    ;Let's play that F-4 again.
    push 0xCA
    push 0xA3
    call opl_write
    add sp, 4

    push (0x20|(4<<2)|0x01)
    push 0xB3
    call opl_write
    add sp, 4
|
\\The Left playback bit is bit 4 \\which makes 0x10 in hex. opl_write(0xC3,0x10); \\Let's play that F-4 again. opl_write(0xA3,0xCA); opl_write(0xB3,0x20|(4<<2)|0x01); | |
Clean up
Because the Ad Lib has no knowledge of what the rest of the computer is doing at any time, it's generally a good idea to have a program clean up after itself before closing.The simplest way to achieve this is to simply set all registers to 0.
| Assembly | Borland Turbo C++ | Open Watcom |
    ;Cycle through all registers
    ;and set them to 0!
    mov cx, 1
    xor ax, ax
    push ax
.clean_loop:
    push cx
    call opl_write
    add sp, 2

    ;Don't forget the OPL3 registers!
    or cx, 0x100
    push cx
    call opl_write
    xor cx, 0x100
    add sp, 2

    inc cx
    cmp cx, 0xF5
    jle .clean_loop
    add sp, 2
|
\\Cycle through all registers
\\and set them to 0!
int c;
for (c = 0x01; c <= 0xF5; c++) {
  opl_write(c,0);
  \\Don't forget the OPL3 registers!
  opl_write(0x100|c,0);
}
| |
Register Table
For the sake of clarity of function we will be breaking down registers into 3 categories:
- Global - configures chip wide features
- Channel - configures channel specific qualities
- Operator - configures a specific operator
| Index | D7 | D6 | D5 | D4 | D3 | D2 | D1 | D0 |
| Global | ||||||||
| 001 | WSEnable | Test Register | ||||||
| 002 | Timer 1 Count (80 usec resolution) | |||||||
| 003 | Timer 2 Count (320 usec resolution) | |||||||
| 004 | IRQReset | T1 Mask | T2 Mask | T2 Start | T1 Start | |||
| 104 | 4-OP B-E | 4-OP A-D | 4-OP 9-C | 4-OP 2-5 | 4-OP 1-4 | 4-OP 0-3 | ||
| 105 | OPL3 EN | |||||||
| 008 | CSW | Note-Sel | ||||||
| 0BD | Trem Dep | Vibr Dep | PercMode | BD On | SD On | TT On | CY On | HH On |
| Channel Wide | ||||||||
| #A0-#A8 | Frequency Number (Lower 8 bits) | |||||||
| #B0-#B8 | Note On | Block Number | F-Number (high bits) | |||||
| #C0-#C8 | Right | Left | FeedBack Modulation Factor | AM/FM | ||||
| Operator Specific | ||||||||
| #20-#35 | Tremolo | Vibrato | Sustain | KSR | Frequency Multiplication Factor | |||
| #40-#55 | Key Scale Level | Output Level | ||||||
| #60-#75 | Attack Rate | Decay Rate | ||||||
| #80-#95 | Sustain Level | Release Rate | ||||||
| #E0-#F5 | Waveform Select | |||||||
table adapted from OPL3 Programmer's Guide
# - The first digit is either a 0 or a 1 depending on whether the lower 9 channels are targetted, or the higher 9 channels.
* Indices 104 and 105 are OPL3 only!
Global Registers
Index 001 - Waveform Select
| Index | D7 | D6 | D5 | D4 | D3 | D2 | D1 | D0 |
| 001 | WSEnable | Test Register | ||||||
- If set to 1, #E0-#F5 will dictate waveforms used by their respective operators.
- If set to 0, all operators will use a standard Sine wave
Note: Test Register must be set to 0 before any further operations may be performed!
Index 002 - Timer 1 Initial Value
| Index | D7 | D6 | D5 | D4 | D3 | D2 | D1 | D0 |
| 002 | Timer 1 Count (80 usec resolution) | |||||||
*This counter clocks on 80 microsecond intervals.
Index 003 - Timer 2 Initial Value
| Index | D7 | D6 | D5 | D4 | D3 | D2 | D1 | D0 |
| 003 | Timer 2 Count (320 usec resolution) | |||||||
*This counter clocks on 320 microsecond intervals.
Index 004 - Timer Controls
| Index | D7 | D6 | D5 | D4 | D3 | D2 | D1 | D0 |
| 004 | IRQReset | T1 Mask | T2 Mask | T2 Start | T1 Start | |||
Index 104 - 4 Operator Channel Switches
| Index | D7 | D6 | D5 | D4 | D3 | D2 | D1 | D0 |
| 104 | 4-OP 11-14 | 4-OP 10-13 | 4-OP 9-12 | 4-OP 2-5 | 4-OP 1-4 | 4-OP 0-3 | ||
- If set to 1, Channel 11 and 14 are combined to make a single 4 operator channel
- If set to 0, Channel 11 and 14 are independent
- If set to 1, Channel 10 and 13 are combined to make a single 4 operator channel
- If set to 0, Channel 10 and 13 are independent
- If set to 1, Channel 9 and 12 are combined to make a single 4 operator channel
- If set to 0, Channel 9 and 12 are independent
- If set to 1, Channel 2 and 5 are combined to make a single 4 operator channel
- If set to 0, Channel 2 and 5 are independent
- If set to 1, Channel 1 and 4 are combined to make a single 4 operator channel
- If set to 0, Channel 1 and 4 are independent
- If set to 1, Channel 0 and 3 are combined to make a single 4 operator channel
- If set to 0, Channel 0 and 3 are independent
Note: this register does not exist on OPL2 devices
Index 105
| Index | D7 | D6 | D5 | D4 | D3 | D2 | D1 | D0 |
| 105 | OPL3 EN | |||||||
Note: this register does not exist on OPL2 devices
Index 008
| Index | D7 | D6 | D5 | D4 | D3 | D2 | D1 | D0 |
| 008 | CSW | Note-Sel | ||||||
Index 0BD
| Index | D7 | D6 | D5 | D4 | D3 | D2 | D1 | D0 |
| 0BD | Trem Dep | Vibr Dep | PercMode | BD On | SD On | TT On | CY On | HH On |
If clear, Tremolo oscillates by 1 dB.
If clear, Vibrato oscillates by 7 cent.
Note: a cent is a unit of measure of musical pitch equal to 1/100 of a semitone.
PercMode - Percussion ModeNote: In order to hear the percussion sounds it is necessary to set the octave and f-number via a write to A6/B6, A7/B7, and A8/B8. Just set the note values and leave the note on flag as 0.
BD On - Base Drum OnChannel Registers
2 Operator Mode Offsets:| Channel # | 0 | 1 | 2 | 3 | 4 | 5 | 6 | 7 | 8 |
| Channel Offset | 0x00 | 0x01 | 0x02 | 0x03 | 0x04 | 0x05 | 0x06 | 0x07 | 0x08 |
| Op 1 | 0x00 | 0x01 | 0x02 | 0x08 | 0x09 | 0x0A | 0x10 | 0x11 | 0x12 |
| Op 2 | 0x03 | 0x04 | 0x05 | 0x0B | 0x0C | 0x0D | 0x13 | 0x14 | 0x15 |
| Channel # | 9 | 10 | 11 | 12 | 13 | 14 | 15 | 16 | 17 |
| Channel Offset | 0x100 | 0x101 | 0x102 | 0x103 | 0x104 | 0x105 | 0x106 | 0x107 | 0x108 |
| Op 1 | 0x100 | 0x101 | 0x102 | 0x108 | 0x109 | 0x10A | 0x110 | 0x111 | 0x112 |
| Op 2 | 0x103 | 0x104 | 0x105 | 0x10B | 0x10C | 0x10D | 0x113 | 0x114 | 0x115 |
Note: Channels 9 through 17 are only available on OPL3
For 4 Operator Mode those offsets become:| Channel # | 0 | 1 | 2 | 6 | 7 | 8 | 9 | 10 | 11 | 15 | 16 | 17 |
| Channel Offset | 0x00 | 0x01 | 0x02 | 0x06 | 0x07 | 0x08 | 0x100 | 0x101 | 0x102 | 0x106 | 0x107 | 0x108 |
| Op 1 | 0x00 | 0x01 | 0x02 | 0x10 | 0x11 | 0x12 | 0x100 | 0x101 | 0x102 | 0x110 | 0x111 | 0x112 |
| Op 2 | 0x03 | 0x04 | 0x05 | 0x13 | 0x14 | 0x15 | 0x103 | 0x104 | 0x105 | 0x113 | 0x114 | 0x115 |
| Op 3 | 0x08 | 0x09 | 0x0A | 0x108 | 0x109 | 0x10A | ||||||
| Op4 | 0x0B | 0x0C | 0x0D | 0x10B | 0x10C | 0x10D | ||||||
Note: This assumes all channels that support 4 Operator pairs are set to 4 Operator Mode
Note: Sound will not play until the associated operators for the desired channel have been programmed.
Generally safe values for an octave of 4 for the traditional 12 note scale are:| F-Number | Frequency | Note |
| 16B | 277.2 | C# |
| 181 | 293.7 | D |
| 198 | 311.1 | D# |
| 1B0 | 329.6 | E |
| 1CA | 349.2 | F |
| 1E5 | 370.0 | F# |
| 202 | 392.0 | G |
| 220 | 415.3 | G# |
| 241 | 440.0 | A |
| 263 | 466.2 | A# |
| 287 | 493.9 | B |
| 2AE | 523.3 | C |
Note: Table taken from Programming the AdLib/SoundBlaster FM Music Chips
Note: This table will not be exact owing to the chip's not operating around a clock exactly matching the western chromatic scale.
For more exact values: F-Number = Music Frequency * 2 ^ (20 - Octave) / 49716HzNote: Formula is from OPL3 Programmer's Guide
Index #A0-#A8
| Index | D7 | D6 | D5 | D4 | D3 | D2 | D1 | D0 |
| #A0-#A8 | Frequency Number (Lower 8 bits) | |||||||
Index #B0-#B8
| Index | D7 | D6 | D5 | D4 | D3 | D2 | D1 | D0 |
| #B0-#B8 | Note-On | Octave | F-Number (high 2 bits) | |||||
Index #C0-#C8
| Index | D7 | D6 | D5 | D4 | D3 | D2 | D1 | D0 |
| #C0-#C8 | Right | Left | FeedBack Modulation Factor | AM/FM | ||||
Note: this only has an effect on OPL3 after the OPL3 flag in register 105 has been set to 1.
Note: this only has an effect on OPL3 after the OPL3 flag in register 105 has been set to 1.
0 - no feedback, 7 - maximum feedback
Note: For channels paired in 4 operator mode, only the lower channel's feedback is used.
| AM/FM Flag | Type | Pattern |
| 0 | FM | Output = Operator2(Operator1) |
| 1 | AM | Output = Operator1 + Operator2 |
| Hi Flag | Lo Flag | Type | Pattern |
| 0 | 0 | FM-FM | Output = Operator4(Operator3(Operator2(Operator1))) |
| 0 | 1 | FM-AM | Output = Operator4(Operator3(Operator2)) + Operator1 |
| 1 | 0 | AM-FM | Output = Operator4(Operator3) + Operator2(Operator1) |
| 1 | 1 | AM-AM | Output = Operator4 + Operator3(Operator2) + Operator1 |
Operator Registers
Index #20-#35
| Index | D7 | D6 | D5 | D4 | D3 | D2 | D1 | D0 |
| #20-#35 | Tremolo | Vibrato | Sustain | KSR | Frequency Multiplication Factor | |||
- 0 - one octave below
- 1 - at the voice's specified frequency
- 2 - one octave above
- 3 - an octave and a fifth above
- 4 - two octaves above
- 5 - two octaves and a major third above
- 6 - two octaves and a fifth above
- 7 - two octaves and a minor seventh above
- 8 - three octaves above
- 9 - three octaves and a major second above
- A - three octaves and a major third above
- B - three octaves and a major third above
- C - three octaves and a fifth above
- D - three octaves and a fifth above
- E - three octaves and a major seventh above
- F - three octaves and a major seventh above
Index #40-#45
| Index | D7 | D6 | D5 | D4 | D3 | D2 | D1 | D0 |
| #40-#55 | Key Scale Level | Output Level | ||||||
- 0 - no change
- 1 - 1.5 dB/octave
- 2 - 3 dB/octave
- 3 - 6 dB/octave
Index #60-#75
| Index | D7 | D6 | D5 | D4 | D3 | D2 | D1 | D0 |
| #60-#75 | Attack Rate | Decay Rate | ||||||
0 - slowest, 15 - fastest
0 - slowest, 15 - fastest
Index #80-#95
| Index | D7 | D6 | D5 | D4 | D3 | D2 | D1 | D0 |
| #80-#95 | Sustain Level | Release Rate | ||||||
0 - silent, 15 - loudest
0 - slowest, 15 - fastest
Index #E0-#F5
| Index | D7 | D6 | D5 | D4 | D3 | D2 | D1 | D0 |
| #E0-#F5 | Waveform Select | |||||||
| Value | Description | Visual |
| 0 | Sine | 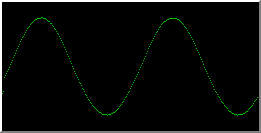 |
| 1 | Half Sine | 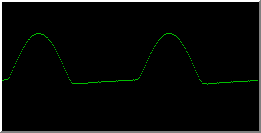 |
| 2 | Absolute Sine | 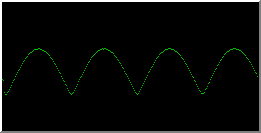 |
| 3 | Pulsed Absolute Sine | 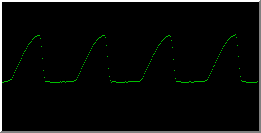 |
| 4 | Sine on even periods only | 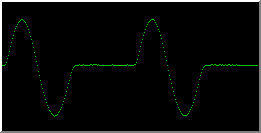 |
| 5 | Absolute Sine on even periods only | 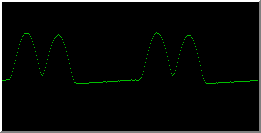 |
| 6 | Square | 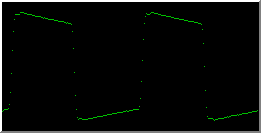 |
| 7 | Derived Square | 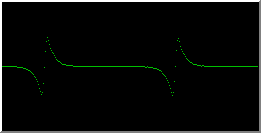 |